
Those of us who love the old muscle cars have often been guilty of focusing so much on what is under the hood that we neglect other very important issues. It is great to have twice the horsepower but it can really get hairy trying to stop the beast with 40 year old brake technology. There is good news from the aftermarket, though, and disc brake conversions are not only cost effective but are literally a bolt on installation.
Remember how it used to be with an all drum system? Anticipation was the watch word. The Air Force calls it "situational awareness" - keeping your head way out in front of the car. The problem was what do you do about life's little surprises like the person who backs out first and then looks. We have become so used to disc brakes, ABS and short stopping distances on modern cars that we have forgotten just how bad the brakes were in the past. I had a '69 Nova that never could stop quickly without pulling to the right. I rebuilt every component and it was still a beast to stop. In desperation I swapped in a junkyard front disc setup from a 396 Nova and that really helped but it took a lot of time finding a good donor back then; probably impossible now.
Now, back to the present. Things have really changed. You can purchase an aftermarket kit that has rotors, calipers, the master cylinder and the spindles for less than a grand and make that baby stop as good as it accelerates. How much is your piece of mind worth? I put a list of suppliers at the end of this article to help. They are all first class and reasonably priced and the kit is actually engineered to provide a the balance and feel you might expect from a new factory performance system.
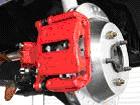
Some considerations. If you want the best stopping power, you will have to upgrade the wheels and tires to something in the 17" range to get the larger discs and calipers to work - never fear, there are 11" systems that will work with your stock wheels. Another consideration is if you want dropped spindles (lower ride height) in the front. There are kits that use stock spindles, kits with aftermarket spindles and kits with aftermarket dropped spindles. Another question is power brakes or non-power brakes. Below is a representation of a premium power kit for a 1968-74 Nova.

The rear disc kit is pictured at the right.

Once you have decided on the kit that is right for you, get out the tools and go for it! Here are the generic steps:
1. Start by removing the cotter pin from the ball joint that holds the tie rod to the steering arm - remove the castle nut. Next remove the shock.

2. Separate the tie rod from the steering arm; use a pickle fork if you have one, if not, a few persuasive taps from a trusty ball peen usually works.

3. Next remove the spindle by removing the cotter pins from the upper and lower ball joints; loosen the castle nuts but do not remove them because the spring is still compressed. Safety is real important here, that spring has enough stored energy to severely injure anyone in the way.

4. Put a floor jack under the lower A-arm and use it to slightly compress the spring. Once this is done remove both the castle nuts and a couple of taps by the ball peen should break the ball joints loose. Next, after you put a safety chain through the spring, slowly lower the jack and the spring tension will be released in a safe manner.

5. Once everything (don't forget the brake line) is undone, the spindle and drum come right off.

6. Now that you can access the suspension components easily, check the condition of the ball joints and look for play in the A-arm bushings; might as well fix it right while you have it partially disassembled.

7. This drop spindle was part of our kit to upgrade the stopping power and give it a little more aggressive stance.

8. Now you just reverse the process using your floor jack to add a little tension to the spring until the ball joint stud threads are through the spindle mounting holes, then screw on the castle nuts and install the cotter pins.

9. Now install the steering arm on to the back of the dropped spindle.

10. Now that everything is back in place it's time to install the new brakes. Pack the wheel bearings. It is probably wise to spend the dough for new bearings just to be sure.

11. Tighten the castle nut to manufacturer's specs.

12. Install the caliper bracket.

13. Install the rotor.

14. Install the caliper and attach the brake line.

Now, how about those rear discs? This job takes a little more effort than the fronts because you have to remove the "C" clips from the differential and pull the axles, but hey, you wanted to change the rear lube anyway - right? All kidding aside, it is the perfect time to add that finned aluminum or chrome differential cover.

With the axles pulled, we could now bolt on our new caliper bracket and reinstall the axle. Make sure to check your axle bearings for wear.

You can now reinstall the axles and slap on the new rotor; use a couple of lug nuts to hold it in place.

Those new calipers sure look sexy! It is an easy bolt up to the brackets you just installed.
The last thing to do is install the emergency brake cables, bleed the brakes and start enjoying that new stopping power!

Some useful resource links:


You're totally right. You have to make sure that you're able to stop that big block engine quickly. I definitely recommend disc brakes conversion kits for the classics that didn't originally come with them.
ReplyDelete